Thursday, September 29, 2011

More Pics of the vintage Swirl dress and Butterick 2104


I Really should have pressed the dress again. I had it "resting casually" on the top of a chair (i.e. thrown carelessly). It's got to go in the wash so I saw no point in frivolous ironing. Ick, I hate ironing! 

Tuesday, September 27, 2011

Butterick 2104 - Pattern Review


Oh Butterick, I do love you! When I make this dress again, I will use contrast piping around the midriff piece and shorten it to just above the knee (I still may shorten it too). Maybe I'll do a red polka dot version. I'll also take out my changes to the original pattern to make it bigger since clearly they were unwarranted. I also had to use bias tape to finish the neckline which while I don't hate it I also am not in love with it. It does break up the green a little bit though. The bodice has a tuck pleat in the CF and a tuck in the CB. The back tuck looks like a inverted 'action back'. In retrospect I really should have taken out about 1 inch from the midriff too. Ugh, This is the first pattern I have done in my own size that was so horribly off.

I think the only thing that makes me crazy is the sizing. It's nothing new to have a pattern just not fit right. Butterick is part of the Big 4 but seriously, the bust was huge. It was a 32 inch bust and I still took out an inch or two on each side. Then the neck line was so low I had to take the shoulders up by 3.5 inches!! Then because I don't have smurf arms I had to cut the arm holes lower which I have never done. All in all the dress turned out fab and no one else is the wiser. I do wish I had finished the inside seams but since I wasn't sure if the dress would be worth saving I just left them.

I'll put it on the dress form to get some better pics. The dress is just so much more lively in person, you can barley see the micro polka dots. I got compliments from people when I dropped the Little Dude off at school so it will go into my regular summertime rotation.

Monday, September 26, 2011

Butterick 2104 almost done!

Saturday, September 24, 2011

Vintage dresser for $10! Stripping it tonight.

I smell BS cooking

Oh Mood, why must you fib! I placed a second order for my wool swatches and the delivery is delayed again because of 'adverse weather conditions'. Seriously.... C'mon Mood, I live in NY too and there are no adverse weather conditions. If you need like four (4) days to process my order than say so, don't tell me the the City is in the middle of some freakish weather.

Today I MUST finish my valances for the dining room. The fabric I chose is here. It matches a coordinating fabric that I used to do a tablecloth style rush mat.  (I'll put pic's up when it's done, I know that sounds confusing).

Update: My ugly fitting vintage Butterick pattern dress is turning out great! I just have to hem the bottom and tack on some bias tape to finish the arm and neck holes. Here is where my world crashes: hemming a circle skirt. Bane of my existence! Anyone have any good way to hem up a massive skirt? Casey is doing a circle skirt sew along so I'm hoping she covers different ways to hem up the monster. Last time I did one I just cut the hem portion off and turned a narrow hem and left it at that. This time it's supposed to get a turned 2" hem. That's 4" I either have to turn up or chop off. This part of sewing is my absolute least favorite of anything. Luckily because the skirt is so voluminous it will hide any uneven boo-boo's. The dress will just have to wait till after the kids go to bed, sigh.... this thing will never get done and I'll probably won't get to wear tit before it get too cold. The green a little springy for Xmas but I suppose I could try making a bright red bolero or something to top it. Or maybe it will just sit in my closet till next spring when the snow melts. Bummer.


Thursday, September 22, 2011

There is too much Wonder in my Land!

I seem to have gone from a sewing rut to a sewing frenzy. I am now working on finishing not one dress but two.  I dug out an old UFO project that I remember not fitting right. It was supposed to be too small so I altered the pattern. Well, once I tried the top half on I realized the ease was huge and now I'd made it even bigger! I think that making something smaller is so much harder than making something bigger. The neckline was gaping like the Grand Canyon but the arm holes and bust points were still unchanged and fit correctly. What the what!

It's really too bad I didn't dig this out to try to fix it earlier. The weather is really making a turn for the worst and I don't think I'll be getting much wear out of a sleeveless dress. There is an overblouse that goes with it (also sleeveless). I could always get one wear out of it dropping the Little Dude off at school but I do already get a bunch of weird looks from the other moms regarding my vintage style wardrobe. They are all just too Ann Taylor to function (but that's just me being judgmental).

Pic's to follow as soon as the zipper goes in!

Here is the plaid that is winning so far. Its cream, soft brown, and rose colored wool.

Tuesday, September 20, 2011

Oh boy, I have never sewn plaid before but here goes nothing! It's a size too big but I didnt wash the fabric first so I am kind of hoping that it shrinks down enough in the first few washes. I'm doing the yellow version.

Saturday, September 17, 2011

Cute little farmhouse style wrap dress! whilt not snagged at the barn sale i did get it for less than $20

This message has been sent using the picture and Video service from Verizon Wireless!

To learn how you can snap pictures and capture videos with your wireless phone visit www.verizonwireless.com/picture.

Note: To play video messages sent to email, Quicktime@ 6.5 or higher is required.

More sewing swag

3 skirts, 2 knits and a cool tulipy cotton.

Barn sale find! mint percolator!

Friday, September 16, 2011

Is it just me or do ya'll see the angry chicken in the clouds too?

Monday, September 12, 2011

Its finally apart! I think if I do 1/4 inch seams I can get 2.5 inches out of it. The only problem Im running into is aparently each pannel is a little different and i didnt notice till they were all apart. Now I dont know which order to put them into. Eeeeekkkk!

This message has been sent using the picture and Video service from Verizon Wireless!

To learn how you can snap pictures and capture videos with your wireless phone visit www.verizonwireless.com/picture.

Note: To play video messages sent to email, Quicktime@ 6.5 or higher is required.
Saturday, September 10, 2011

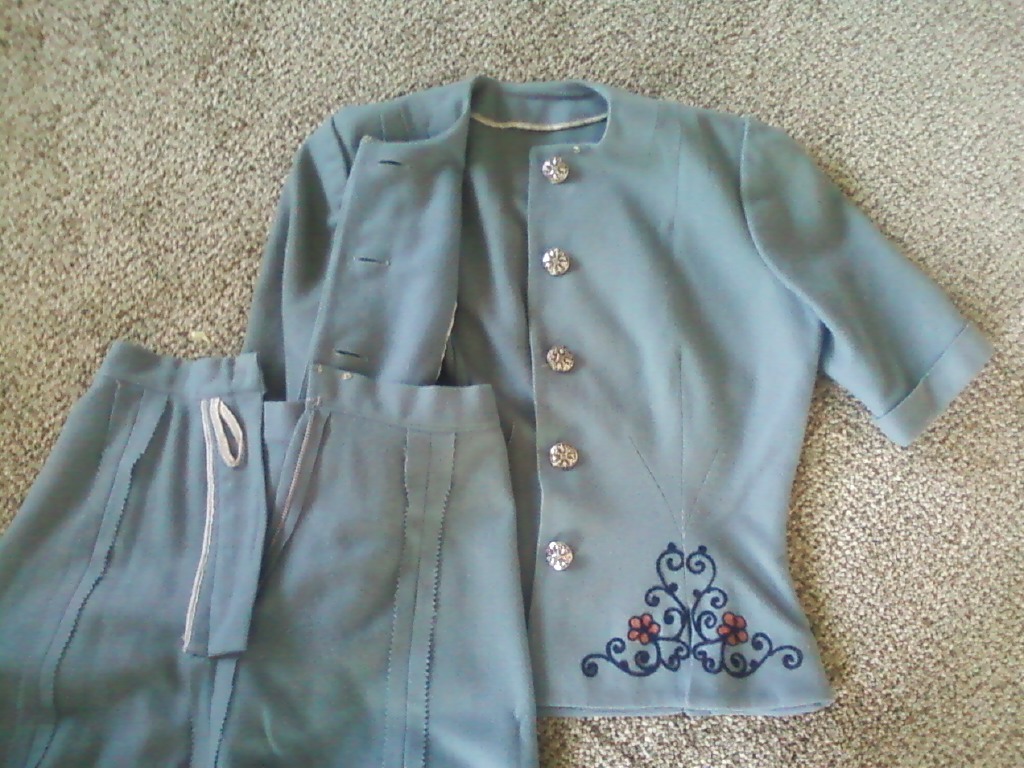
The 1940s redo suit begins!

I have been staring at this suit for months in my closet wondering what in the heck i was going to do with it to make it wearable. I have worn the jacket out a few times and its just lovely but the skirt just hangs in my closet looking sad. The only way I can figure out how to give it a couple extra inches was to completely take the skirt apart. This involved unpicking the waistband, six gore skirt, and hem. I left the zipper alone as it was lapped but did take off the zipper lap on the inside. This little part is going go to go on the waistband in the back to add those couple extra inches that I  need. I was actually kind of surprised that the waistband was longer. I have a few vintage skirts from the late 50's and there tends to be a couple inches overlapping the zipper and hooks. I was not so fortunate with this suit. I know basically nothing about wool. I read up on the Sierra Trading Post website here regarding wool weights, classifications etc as I wanted to make this coat for winter in wool. It really didn't help with the skirt. It's a very loose weave wool, light and airy but not scratchy. Mystery or not it's going to look killer when I'm done. Pics to come soon!

My vintage suit find! I was thinking 1940s. It's a light bluelight weight wool with hand stitching details. Clearly handmade by someone who knows what they were doing. The jackets fits however the skirt is about 2 inch too small in the waist. As it is, i can zip and snap it but only if i dont plan on sitting, moving or breathing. Without even measuring I'm pretty sure it's a 30,25,34(or 33). That follows pretty standard for patterns of that time.

Wednesday, September 7, 2011

Advance 6261 - Pattern Review

Simple: I LOVED it! I have a few requests from friends to sew this for them. But lets be serious, I'm selfish, working on a budget, and have two kids. It ain't going to happen. My bestie Bridgette will get the shirt I made and when I get to it I'll make another for myself (I have fabric left).

The pattern itself was very simple with only the collar giving me a bit of trouble. I completely blame the stripes and not my lack of sewing prowess. The collar gaped a bit on the corner so i made an almost invisible tuck to help it back into place. I put the interfacing on the wrong side (damn you unprinted pattern and your damn notches and varying circle punch out sizes!!) so of course I didn't notice until it was constructed and half sewn in. I also added another button as it only called for two. Yep, two buttons on a shirt; not working for me. The waist was two inches smaller than mine on the pattern size guide. I did the tissue fit and it fit. Stranger things have happen with these old patterns though. Sooooo, I just did 1/4 inch SA from mid waist to the bottom instead of 1/2 inch and it fit perfectly. Other than those small details it was a breeze and one of the few patterns I will remake in other colors.  

Monday, September 5, 2011

Old sewing box before... Oh, and on a safety note, screwdrivers should not be aimed towards your hand whilst attempting to remove old hardware.

Sunday, September 4, 2011

Just so we're clear, I hate having my picture taken but the shirt is so super cute.

The disappearing grocery budget

As I dig deeper and deeper into my grocery budget for barn sale money I can't help but think of all the spaghetti and hot dogs we will be eating this week. I just asked my little guy if he wanted to come with to revisit the awesomeness that was yesterdays barn sale. I put down a couple things and am now having reverse buyers remorse; "junk setter-downer-remorse". They had another pink prairie style full skirt and I totally forgot to look for Princess Bubblegum style dress patterns for Halloween. I didn't even dig through all the fabric either. It's not my favorite chore since its usually hot, humid and kinda smelly up in the loft and the fabric isn't always good. My son also wanted to find small tools or as he says "toys for little boys for making stuff like daddies". So.... off we go! Pictures to come of anything good.

Saturday, September 3, 2011

My $18 haul! all of the sewing notions came inside the sewing box (which I'm taking apart and repainting). im really excited about the stovetop percolator. its in minto condition and sells for $30_$40. i got it for $3.

Thursday, September 1, 2011

Totally awesome!

Advance 6261 - sneak peak!!

I am LOVING this shirt! My goal this summer was to sew more separates and I had an epic failure with that attempt. But in retrospect I wish I had done it. This shirt went together pretty quickly. I had a couple of boo-boo's which I'll go over when I do my final review. I am certainly making another one of these shirts in white if not a couple more colors. The collar is awesome beyond words and the tucks are really flattering. What I'm most surprised about is the fit. The pattern was for a 30 inch bust and 25 inch waist. I was going to add 2 inches to each to bring it up to my measurements but it fits without any alteration. I have done a couple of the older Advance patterns and find them to fit a little large in the bust but I think that is really a modern bra issue not a poor pattern mistake. Otherwise the patterns are extremely accurate and the ease is perfect. I assembled the main shirt pieces with pins and did the old school try on test and it fit so I hoped for the best. I never make a muslin.... I like to live dangerously.

To match the shirt I am using the same men's shirting from the last dress I made. The fabric was wonderful and will suit the new top perfectly. I'll be sure to post a pattern picture when I start it. 

Decisions decisions....

Update on Advance 6261.... Its flippin' awesome! Just need to hem, add cuffs and decide on buttons.

Wednesday, August 31, 2011

Happy Birthday Katy! Its going to be a super bright splash of color when winter is at its worst.

McCall's 1712 Pattern Review

I have done this pattern before here and, as before, it turned out great. This time I self lined it and just turned it instead of using bias binding. I think this method is far superior than 6.5 yards of binding and looks just at good (also a lot faster!). It also gives another layer of protection to wetness and paint etc. I also added a second layer of pockets situated above the bottom pockets. The original pattern called for only three rather shallow pockets. IMHO you can never really have too many pockets on a child's smock; they are always squirreling away something. My pattern didn't have directions but as it was only 1 pattern piece it wasn't too difficult to figure out where to put the closings and where to sew up the sides. The lovely little Marisol in the back view picture wears a solid six and still had plenty of room to grow.

If I were to change anything I would maybe make the arm holes a little deeper since I lost some fabric in the improvised seam allowance. It's not snug under the arm but I feel like it would be even easier for the kids to dress themselves with a little extra room. Overall I think the smock turned out fantastic and is attractive and utilitarian. The little girl I made it for loves peace signs and wanted something not too girly. While it's not my personally favorite fabric choice, the crazy patterns seems less obnoxious in a cute apron form.

The buttons are just decorative. The tabs have sewn in velcro closing the smock.

Steve wasnt exactly thrilled to wear the girly smock

Monday, August 29, 2011

New project in the pipeline...

Sunday, August 28, 2011

End of summer UFO project wrap up

I'm almost done with all of my UnFinished Objects (UFOs). All I really have left are the valances for the dining room. I think the pillow covers for the couch came out lovely. The zippers, while not quick, went in smoothly. I think I kept putting off this boring project because of my loathing for zippers. Pillow covers are certainly not a glamorous project. It's just four big squares with zippers. I hate all the quadruple measuring and straight sewing but I have to admit that the instant gratification of in instant ugly couch makeover is refreshing. Once I got the pillows squeezed into the covers my husband suggested that I do the bottom cushions in that reverse beige chenille. I have to keep myself occupied during the winter somehow...

Finished! all 4 pillows are reversible. The old couch looks so much nicer!

Pillow cover number 1! and take a look at that zipper.... what zipper you say? oh yes, its totally invisible (as its supposed to be but doesnt always turn out that way)

Thursday, August 25, 2011

I have been working on an table runner made from vintage doilies. They have age stains so I thought maybe either bleaching it all white, tea staining it or dyeing it all a 1930s pastel lavander color? Opinions please!

Tuesday, August 23, 2011

You say sideboard, I say Buffet

I am almost done with the refinishing of my antique buffet. I originally thought it was a 1920s piece; after much google'ing I feel as though I can date it as Victorian (read late 1890s). I stripped of the old grungy green paint and the original skuzzy (a very technical term) ugly, dark stain. I used steel wool dipped in Formby's to treat the original wood. After some scrubbing it worked perfectly! I used a standard paint stripper to take care of the ugly green painted portions. It still boogles my mind to think that someone painted over perfect wood. Tiger Maple to exact. Its beautiful and my cruddy pictures don't do it justice. I don't feel bad about getting rid of that original nasty stain either. The Formby's doesn't take away all the stain (I didn't extensively sand it down), just removes the top gunk. It left the wood a beautiful tea color instead of the original black coffee color. You really couldn't see the wood grain the way it was originally treated. The hubby and I had such fun doing this together we are now on the lookout for another gem to refinish! Did I mention that I only paid $120 for the buffet? Yep, total steal!

This was my color inspiration. Its a 1940s cake and pie holder. The hubby matched the colors exactly

FWD:

Almost done! just needs the sunflowers on the side. i kinda regret repainting the sides but we can always strip those later. never mind our improvised baby latch system...

Sunday, August 21, 2011

Once we started we couldnt stop. I think it tiger maple. I can not some dingus painted and stained this awesome buffet

Monday, August 15, 2011


I wore my Anne Adams #R4503 dress antiquing and junk shopping with my mom today. I only shortened the sleeves and disregarded the cuffs. Its super comfortable too. The bodice fabric is vintage (thanks @marysue!) and the skirt is mens shirting material.

Friday, August 12, 2011

Call me crazy but im going to try to finish this dress for tomorrow. mind you i'm only starting it now..... totally rockabilly!

Thursday, August 11, 2011

The big monkey needed a baby.

Sock monkey for my sick boy. He now requests a sock animal every time one of the kids gets sick. I'm good with that, it was quick and fun.

Tuesday, August 9, 2011

Ladybug booties for a gift. I must be on a sewing roll right now.

Saturday, August 6, 2011

Its been a while since I posted a project. This is an apron I made as a gift. It's a vintage 50s table runner with lace trim, ribbon ties, and a flower on a pin with a vintage button.